How to Set up R Server Profiles
Opal is able to connect to multiple R servers: see R Server documentation. The benefits of having multiple R servers are:
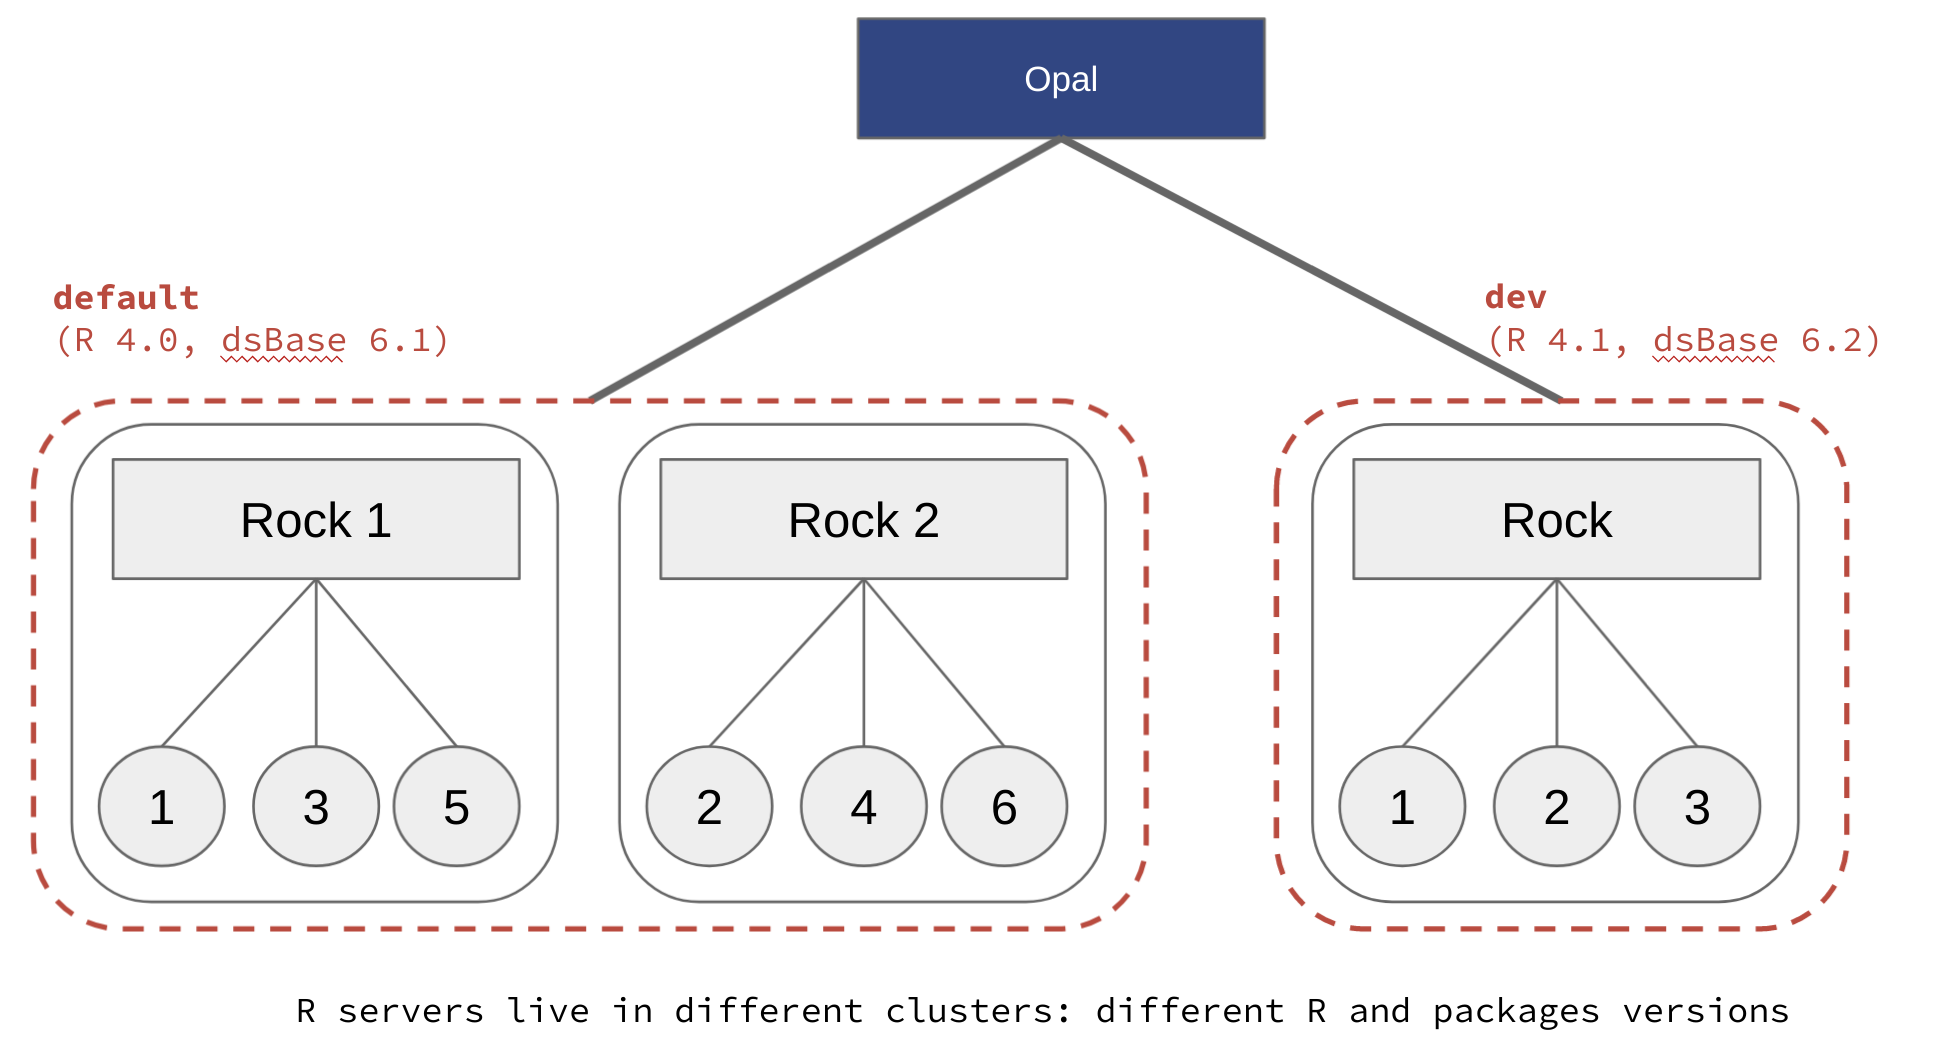
Having different versions of R and/or R packages (i.e. profiles) installed, for reproducible science (see also How to Set up R/DataSHIELD Client Profiles),
Balance the computation load other several R servers with same profile.
Opal has two different strategies for establishing connection with R servers (see Apps documentation):
Self-registration, which is flexible and then appropriate for load balancing,
Service discovery, which is preferred for managing multiple R server profiles.
Whatever the chosen registration strategy, the name of the R profile in Opal is the name of the cluster declared in the Rock R server configuration (see Cluster Node Configuration documentation).
Using the Docker technology, several R servers can run on the same host. An R server packaged in a Docker container is also easier to maintain, when R packages are to be updated or when a computation environment is to be restored. Therefore, the following instructions will recommend the Docker usage and more specifically the Docker Compose tool.
Step 1 - Prepare Docker Images
The following Rock R server Docker images are proposed:
Image |
Description |
|---|---|
Rock R server application with R and useful R packages and system libraries.
Everything you need for a standard R server connected to Opal (reporting, resources, analysis).
Available tags are:
-
latest, <rock_version> (for instance 1.0)-
<rock_version>-R<r-version> (for instance 1.0-R4.1). |
|
Based on
obiba/rock image and includes the datashield/dsBase R package for basic DataSHIELD analysis.This is the recommended base image for the DataSHIELD users.
Available tags are:
-
latest, <dsBase_version> (for instance 6.1)-
<dsbase_version>-R<r_version> (for instance 6.1-R4.1).As a reference, see datashield/rock-base Dockerfile.
|
|
Based on
datashield/rock-base image and includes the datashield/dsMediation R package for mediation related DataSHIELD analysis.Available tags are:
-
latest, <dsMediation_version> (for instance 0.0.1).As a reference, see datashield/rock-mediation Dockerfile.
|
|
Based on
datashield/rock-base image and includes the isglobal-brge/dsOmics R package for omics related DataSHIELD analysis.Available tags are:
-
latest, <dsOmics_version> (for instance 1.0 or 1.0.7).As a reference, see datashield/rock-omics Dockerfile.
|
|
Based on
datashield/rock-base image and includes the isglobal-brge/dsExposome R package for exposome related DataSHIELD analysis.Available tags are:
-
latest, <dsExposome_version> (for instance 1.0 or 1.0.1).As a reference, see datashield/rock-exposome Dockerfile.
|
From these base images, it is possible to make your own, with additional R packages and system libraries installed. See for instance these demo images:
obiba/rock-demo:geo Dockerfile installs geo system libraries and a DataSHIELD R package for geolocalized data analysis.
obiba/rock-demo:survival Dockerfile installs the dsSurvival DataSHIELD package.
Step 2 - Docker Compose Configuration
Your Docker Compose configuration can include the Opal server but it is not mandatory, as the Opal server can be installed from a native package, whereas the multiple R servers will be started from docker images.
Different datashield/rock-base images can be used to expose different R packages versions. The DataSHIELD researcher can specify the appropriate profile name at connection time to ensure that the analysis envrionment is reproducible.
In the following example, several R servers will be accessible through their own port number, and the Opal server must be configured accordingly.
version: '3'
services:
    datashield:
        image: datashield/rock-base:latest
        ports:
            - ${PORT_DEFAULT}:8085
        environment:
            - ROCK_ID=${ROCK_ID}
            - ROCK_CLUSTER=default
    datashield-61:
        image: datashield/rock-base:6.1-R4.1
        ports:
            - ${PORT_BASE61}:8085
        environment:
            - ROCK_ID=${ROCK_ID}-base-6.1
            - ROCK_CLUSTER=base-6.1
Warning
Make sure there is always an R servers cluster name called default, which is the default profile name expected by Opal when none is specified.
Step 3 - Discover Rock R Servers in Opal
To configure Rock apps discovery in Opal, you can:
Either set the
apps.discovery.rock.hostsproperty in the opal-config.properties file, see Apps Configuration documentation. Opal server restart is then required.Or declare dynamically the new apps in the Administration > Apps page, Discovery section, see Discovery documentation. No Opal server restart is necessary.
You can then verify in the Administration > R page that several R servers are connected to, organized by cluster/profile. Each Rock R server reports host information (CPU cores, free memory) and the number of active R sessions.
Step 4 - Use R Profiles from R Client
In an R console, install the opalr R package. See also the Using R documentation.
The following script will list the R profiles on the opal-demo server:
# load opal library
library(opalr)
# connect to the opal server
o <- opal.login(username = "administrator", password = 'password', url = 'https://opal-demo.obiba.org')

# list R profiles
opal.profiles(o)

# disconnect
opal.logout(o)
When an R operation requires to assign data and perform calculations in an R server, the R server profile can be specified at login time: a remote R session will be created in an R server from the named cluster.
# load opal library
library(opalr)
# connect to the opal server with profile 'geo'
o <- opal.login(username = "administrator", password = 'password', url = 'https://opal-demo.obiba.org', profile = "geo")

# verify that 'dsGeo' is installed in this profile
oadmin.package_description(o, "dsGeo")

# assign some GPS data, stored in a file resource and compute summary
opal.assign.resource(o, "res", "RSRC.gps_data")
opal.assign.script(o, "gps", quote(as.data.frame(res)))
opal.execute(o, "summary(gps)")

# disconnect
opal.logout(o)
Step 5 - Troubleshooting
If anything goes wrong in an R server, check the output of the R commands in the R server logs.
Note
Go to the Administration > R page,
Select the R server profile/cluster,
Download the R server logs.
This log may contain information, when for instance an R package is broken or some R function calls output some error/warning messages without failing properly.