How to Set up DataSHIELD Server Profiles
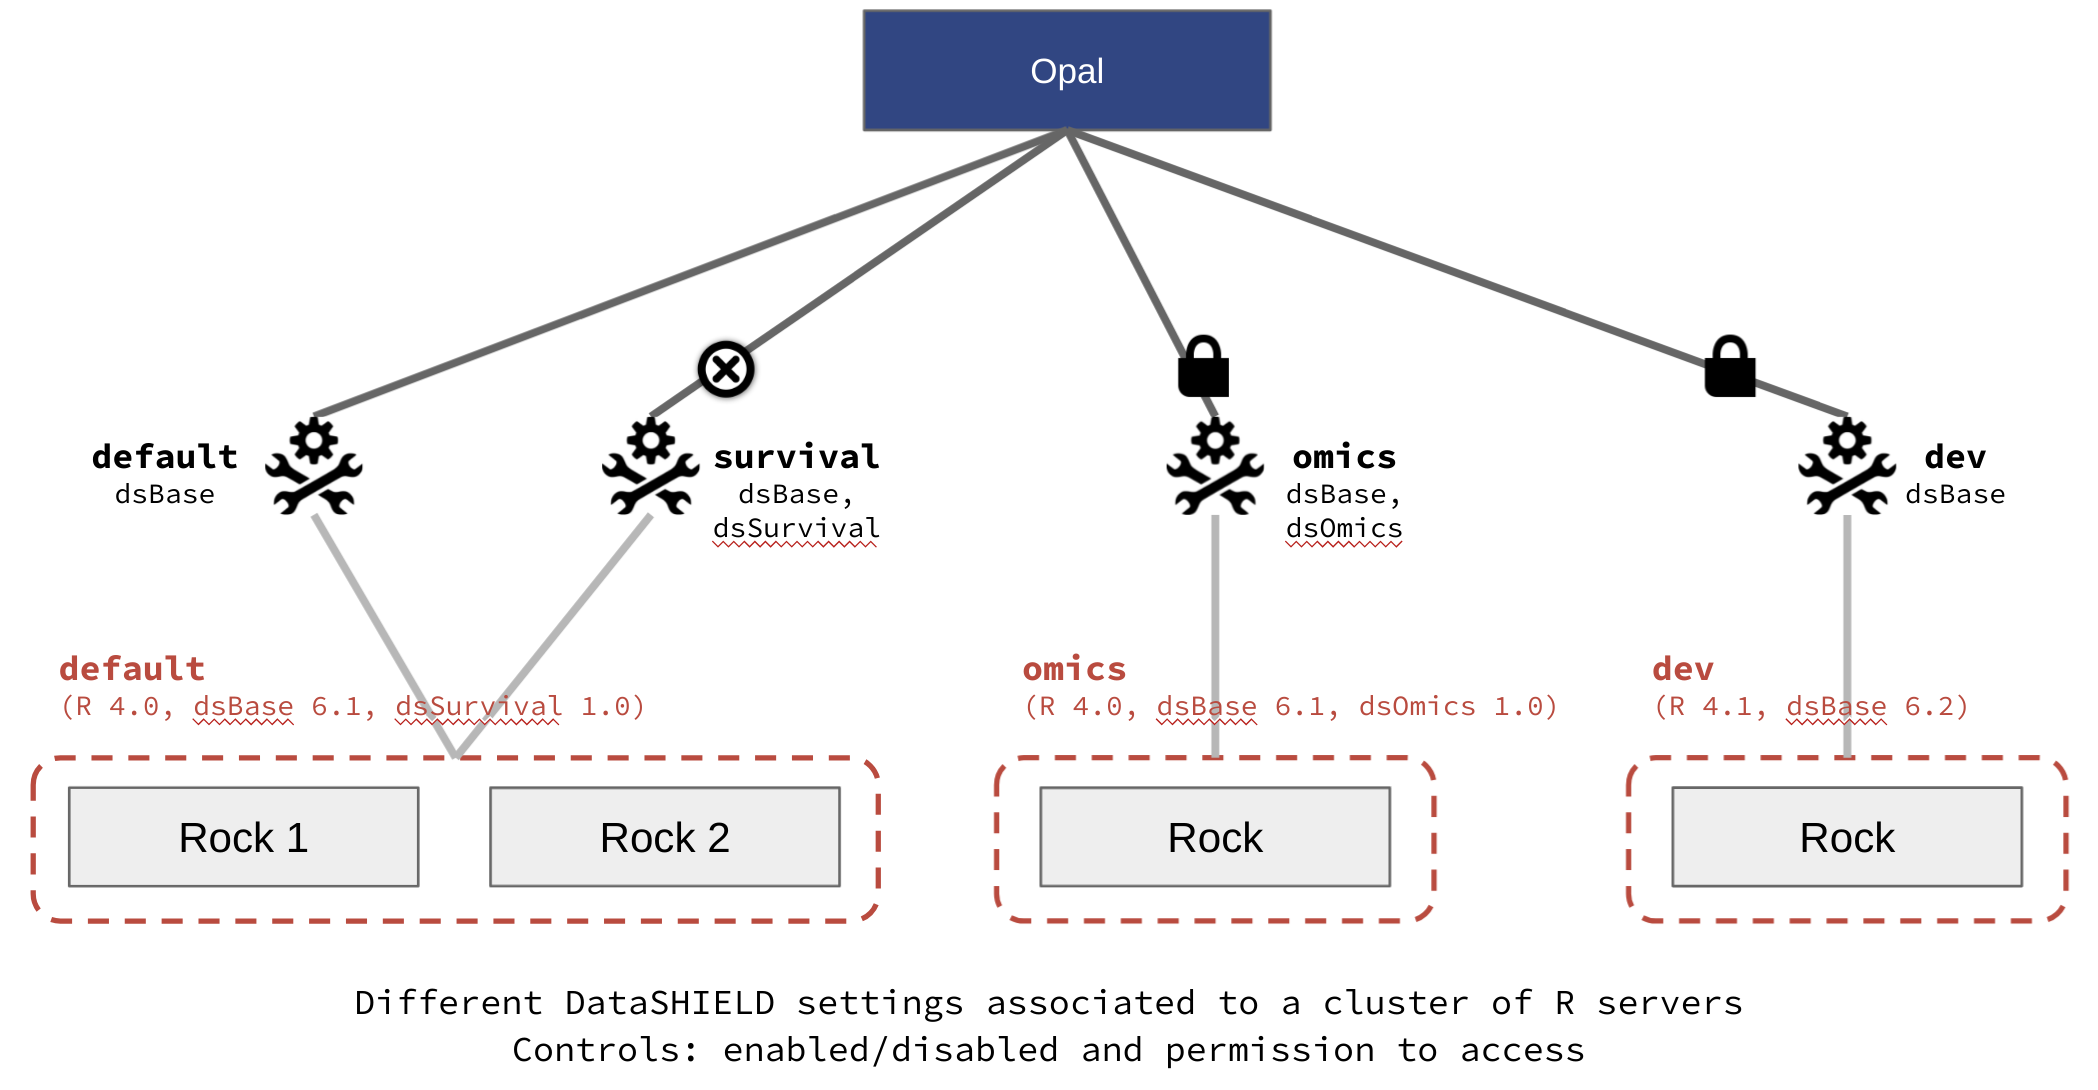
Opal is able to connect to multiple R servers: see R Server documentation. R servers are organized in clusters. The cluster name is the R server profile name. From each R server profile, a DataSHIELD profile can be derived.
See also How to Set up R/DataSHIELD Client Profiles.
The following instructions will guide you in setting up the DataSHIELD profiles.
Step 1 - Setup R Servers
Everything starts with Opal connecting to different R servers, then follow the How to Set up R Server Profiles instructions.
Step 2 - Initialize DataSHIELD Settings
Connecting Opal to a R server with DataSHIELD R packages is not enough for having a functional DataSHIELD profile: DataSHIELD settings must be initialized, i.e. the allowed aggregate and assign functions along with R options must be declared. The following operations consist of asking Opal to inspect the R packages installed in the R server, to find their DataSHIELD statement.
From Administration Page
Note
Go to Administration > DataSHIELD page
Select a profile in the Profiles section
Press Initialize in the profile’s Settings section
Press Enable in the profile’s Status section
⇒ The DataSHIELD settings are read from the installed DataSHIELD R packages and set as the profile’s configuration.
Using R
The opalr R package (see Using R documentation) has many functions for DataSHIELD administration, their name starting with dsadmin.. Initializing and enabling a profile can be done from R as follow:
library(opalr)
o <- opal.login(username = "administrator", password = "password", url = "https://opal-demo.obiba.org")

# init and enable the 'default' DS profile
dsadmin.profile_init(o, "default")
dsadmin.profile_enable(o, "default")

opal.logout(o)
Step 3 - [optional] Add DataSHIELD Alternate Profiles
In Step 2, the main DataSHIELD profile was based on a R profile and the discovered DataSHIELD settings. It is also possible to declare a DataSHIELD profile based on the same R profile but with a different name and different settings (functions and R options).
From Administration Page
Note
Go to Administration > DataSHIELD page
Press Add Profile in the Profiles section
Select the name of the R servers cluster on which the profile will be based (i.e. where the R sessions will be created), and Save
From the created profile, in the Settings section, you can Initialize the settings and amend the list of R functions exposed and the R option values
Press Enable in the profile’s Status section
⇒ The DataSHIELD settings are read from the installed DataSHIELD R packages and set as the profile’s configuration.
Using R
Create a DataSHIELD profile and modify its default settings as follows:
library(opalr)
o <- opal.login(username = "administrator", password = "password", url = "https://opal-demo.obiba.org")

# init and enable the 'geo-alt' DS profile with a different privacy level option
dsadmin.profile_create(o, "geo-alt", cluster = "geo")
dsadmin.profile_init(o, "geo-alt")
dsadmin.set_option(o, "datashield.privacyLevel", "10", profile = "geo-alt")
dsadmin.profile_enable(o, "geo-alt")

opal.logout(o)
Step 4 - [optional] Restrict Access to DataSHIELD Profiles
By default a DataSHIELD profile can be used by any DataSHIELD user. Restricting access to advanced users can be useful when:
Privacy levels are more relaxed
Some server-side DataSHIELD functions are still experimental
A DataSHIELD package is being developed
From Administration Page
Note
Go to Administration > DataSHIELD page
Select a profile in the Profiles section
Press Restrict Access in the profile’s Permissions section
Press Add Permission and specify either user or group names who will be allowed to use this profile
Using R
Following the example in Step 3, call the appropriate dsadmin.profile function:
# only members of the 'developers' group can use this profile
dsadmin.profile_perm_add(o, "geo-alt", "developers", type = "group")
Step 5 - Use DataSHIELD Profiles from R Client
For the prerequisites, see the Using DataSHIELD documentation.
When setting up the DataSHIELD connection information, the DataSHIELD profile can be specified (otherwise it fallbacks to default). As an example:
library(DSOpal)
library(dsBaseClient)
builder <- DSI::newDSLoginBuilder()
# connect to 'study1' on its 'geo' profile
builder$append(server = "study1",  url = "https://opal-demo.obiba.org",
           user = "dsuser", password = "password",
           profile = "geo")
logindata <- builder$build()
conns <- DSI::datashield.login(logins = logindata)

# list available (and current) DS profiles
datashield.profiles(conns)

# list the allowed aggregate functions
datashield.method_status(conns, type = "aggregate")

# assign data and compute
datashield.assign.table(conns, "D", "CNSIM.CNSIM1")
ds.colnames("D")

datashield.logout(conns)
Note that:
The profile name can be different from one DataSHIELD server to another.
There is no check whether each DataSHIELD servers have the same profile settings.
For user-friendliness and reproducibility, it should be encouraged to coordinate when planning DataSHIELD profiles. Sharing the same R server Docker image and initialization R scripts should help.
When dealing with different DataSHIELD server profiles that require incompatible client-side packages, see proposed solution of How to Set up R/DataSHIELD Client Profiles.